Speaker Positioner

FINDING THE RIGHT SPOT:
Audiophiles can spend considerable amounts of time positioning and then re-positioning their speakers in search of the best sound possible in their listening rooms. Since every room can impart a significant sonic signature on the sound that is heard by the listener, it is critical to be able to determine the optimized position for a pair of speakers within a given room.
ONE INCH EQUALS A MILE:
All speakers will sound different when placed in different rooms - even if placed the same distance from the back and sides walls in each. The reason is that each room will impart it's own "sound" overlaid on the sonic character of the speaker itself. This overlaid room-sound can be dramatic and profound with the potential to make a good sounding speaker sound quite bad. Small positional changes of the speakers location of just an inch or two can often result in dramatic changes in how they sound. Here the rules of physics seem to almost collapse as inches can seem like miles ... miles away from sonic nirvana. Bass can go from hollow to boomy, soundstage can change from flat to deep, midrange and highs can shift from dull to shrill - all with just a few inches of change in the position of the speakers in the SAME room.
LOCATION, LOCATION, LOCATION:
This phenomenon of seeking or failing to find the optimal speaker position has driven audiophiles crazy for years, resulting in endless adjustments and readjustments to speaker and listening positions. While the uninitiated will watch in awe and confusion not understanding the relentless quest that would drive a sane person to endlessly move a pair of speakers around in a room, those blessed with having heard a high quality audio playback system properly setup quickly understand the plight of the seeker. This quest to find the optimal position for speakers, if not diligently undertaken, can result in thousands of lost dollars as a listener roams from one speaker to another without really understanding the problem may not be the equipment they are using ... rather the location of the equipment. As in real estate, the golden rule here is location, location, location.
THE TRADITIONAL APPROACH:
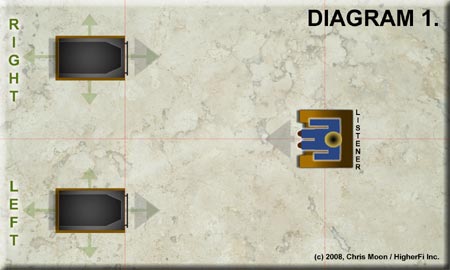
The typical approach to solving this problem is for the audiophile to setup one or two speakers in their listening room and then either have a friend come over and move the speaker(s) while listening to them or to jump up and down from the listening position to the speaker and back moving the speaker a small amount each time. This "traditional approach" to optimizing speaker placement is shown below in Diagram 1:

The challenge with this approach is that it can be very time consuming with two people (not to mention frustrating for the non-audiophile who may be helping you move the speakers). If attempted alone, it can be nearly impossible for the ear to remember the small changes after one has run over to the speaker(s), moved it and then returned to the listening position to evaluate the change. In short, there needs to be a better way ... one which:
- 1. Can be done in real time, so changes can be instantly heard,
- 2. Does not require another person, so it can be done alone,
- 3. Results in finding the best position for your speakers in the shortest time with the least effort.
THE INVERTED LISTENER:
After years of attempting the traditional approach I set off in search of something better. I had found that using the old method was so cumbersome and time consuming I often spent far less time on this important task than I needed to ... and the sound of my system suffered for it. Of course, I tried throwing more money at the problem by purchasing elaborate technology to measure and digitally correct for my laziness, and while some improvements occurred they always seem to come at some (sonic) expense that left me less than fully satisfied. Surely there had to be a better way, and one day in a conversation with a top speaker designer ... the little secret was revealed to me.
" Sound travels from the speaker to the listener - right?"
"Correct," I said.
"Well did you know the sound is the same whether it travels from the speaker to the listener OR the listener to the speaker?"
The implications hit me like a ton of rocks.
"So your saying if the speaker is located where the listener would normally sit and the listener is located where the speaker would normally be - then the sound is the same?"
"If the room geometry is fundamentally the same at both locations ... yes".
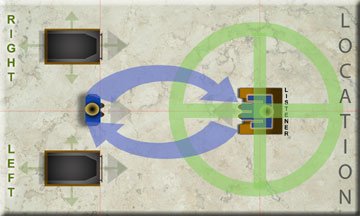
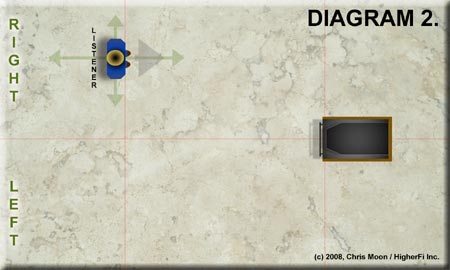
Thus the "inverted listener" could swap positions with the actual speakers and "hear" in real time the effect of their position in the room. While it sounds a bit confusing to explain, see DIAGRAM 2 below for an easy visual explanation that will immediately make it very clear:

So the procees is simple.
Place ONE speaker where the listener would sit (at the listening position - yes you will have to move your chair or sofa) and then go and stand where the speaker (RIGHT SPEAKER - at first) would normally be. Now you have inverted the normal listening arrangement essentially swaping places with your speaker(s). The reason for doing this is that now you will be able to actually hear how the position of your speaker in that location sounds (yes, it is very obvious and not subtle).
So here is the process for optimally locating the position for your first (RIGHT CHANNEL) speaker in the room:
1) Play full range mono music (set your preamp/processor to mono if playing a stereo recording) that has good bass content through the ONE speaker now residing at your normal listening position (see above) as you stand where the speaker used to be located.
2) Start by moving yourself forward and back (closer and further away from the back wall) and listen specifically for bass - you will probably hear it go from hollow, to tight, to boomy as you move forward and back. The goal is to find the location where the bass is tight, clean and natural sounding without boominess or hollowness. Note this distance from the back wall by placing some tape on the floor where you are standing (blue painters tape works great).
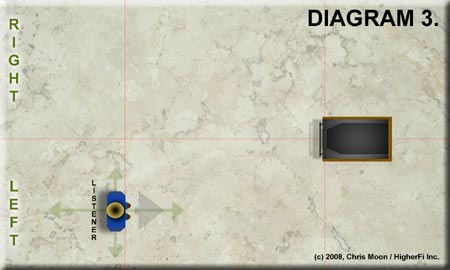
3) Now move from side to side and listen more for the midrange - voice is good to listen to here. You will probably notice if you get too close to the side wall, the sound will suffer and start honking, gaining edginess and hardness. Move away from the side way until the music (and voice in the music) sound more natural sounding (probably over 2-3ft away). Once you locate this point, trying moving forward and back again just to hear if there is any change in the sound - go for that which sounds the smoothest and most natural sounding. Once you have the spot, mark it again with tape on the floor. This will be the front center location for your right speaker. For the next step, see below DIAGRAM 3.

4) The next step involves physically moving yourself to the other side of the room where you previosly had your left speaker located (this should have been moved out of the way temporarily for this exercise - the further away the better!)
5) Repeat Step 2, from above. Ideally your front and back distance will be the same - if it is not then you will need to split the difference as the front and back distance of both speakers MUST BE THE SAME distance from the back wall. Note this front to back location with tape on the floor for the LEFT speaker.
6) Now repeat Step 3, from above. Here the distance from the side wall does not necessarily need to be the same as it is for the right speaker, especially if you have different wall materials on one side than the other (glass on one side and sheetrock on the other, for example). The main thing here is to get away from ringing, edginess, hardness, or dull and cancelled out midrange - find the "sweet spot" where everything sounds natural and mark it on the floor with tape.
THE PAYOFF:
Now its time to reap the rewards of your efforts, and they will likely be signicant. Move your speakers to the each of the locations indicated by the tape you placed on the floor in your listening phase - do not be quick to pull up the tape - leave it there for a while as you listen in case you decide to fine tune further. Remember to place the front/center of the speaker at the point indicated by the two pieces of tape you put down - one for front to back distance and the other intersecting at the best side to side distance. Initially, place the speakers so they are parallel to the walls shooting straight forward (no toe-in).
Place your seat/sofa back to the listening position, sit down and play some full range music (in stereo). Adjust toe-in (the angle the speakers tilt inwards) to adjust for optimal sound stage size while not letting the speakers become too bright and hard sounding. You now have your speakers optimally placed in your room. It is likely once you do this and realize the benefits, you may decide it was so well worthwhile that you want to go back and repeat the exercise REALLY paying attention ... by all means do so and reference your old tape positions to see if your new locations are the same or different. Do it, it's worth it, and it just may bring a whole new level of enjoyment of your system - FOR FREE!
